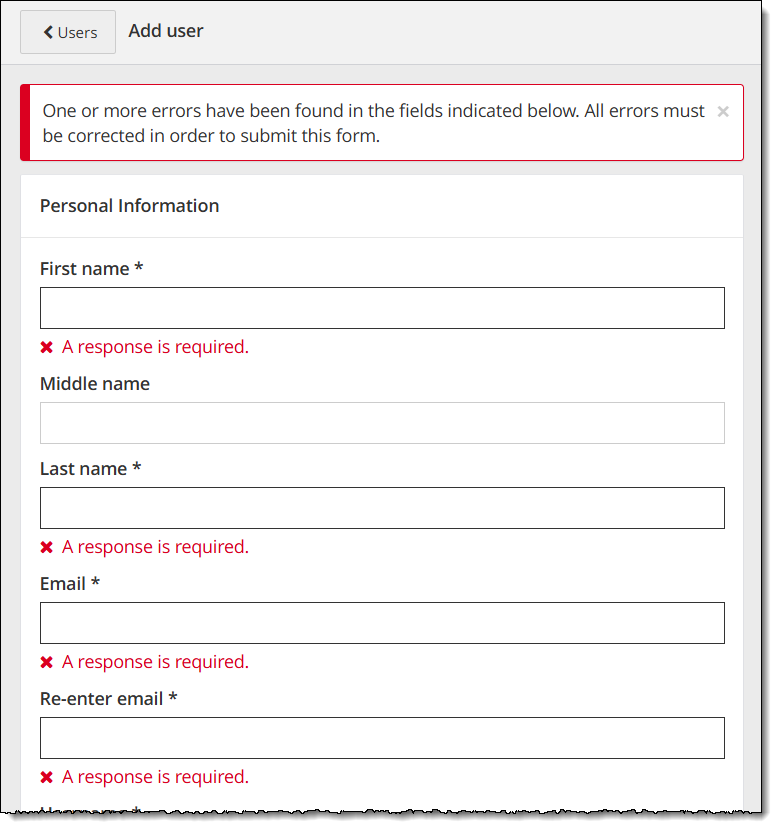
Add user account
All user accounts must be associated with at least one organization. User accounts may be associated with multiple organizations. You must add at least one organization before you can add any user accounts.
|
Use caution in associating a user account with more than one organization if the user accesses the Scheduler application. User accounts associated with more than one organization are blocked from logging in to Scheduler. If a user must be associated with more than one account, you should create a separate user account for each organization. |
|
Pearson VUE Navigator account activation emails are automatically sent to new users as soon as their user account is saved. The activation link provided in the email expires after 7 days. If the new user fails to activate their account within 7 days, the link expires. The user must contact Pearson VUE support to reset their account and a new email with an active link is sent to the user. If you are adding organizations before you are ready to allow users to log on and perform tasks in the system, you are advised to hold off on adding the user accounts until you are ready for the users to actively work in the system. |
All mandatory fields are marked with an asterisk "*".
Enter user account personal information
You must provide information for all the mandatory fields. ![]()
![]()
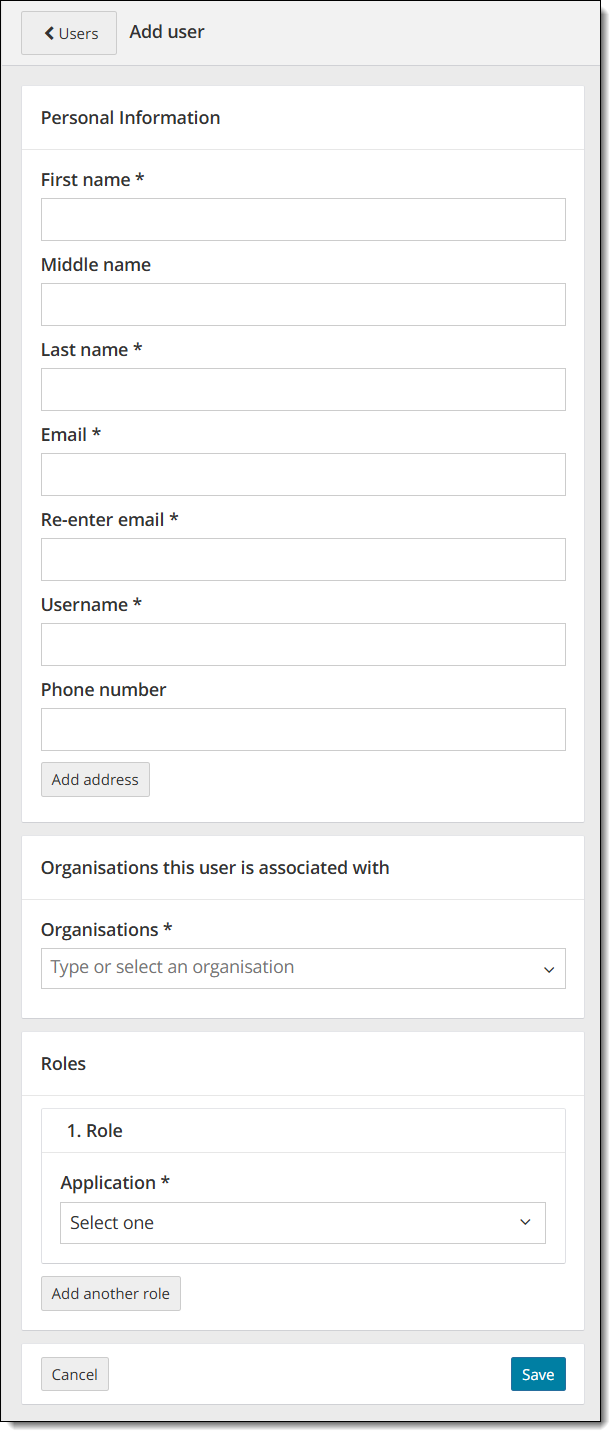
- Select Add user
 from the User list page.
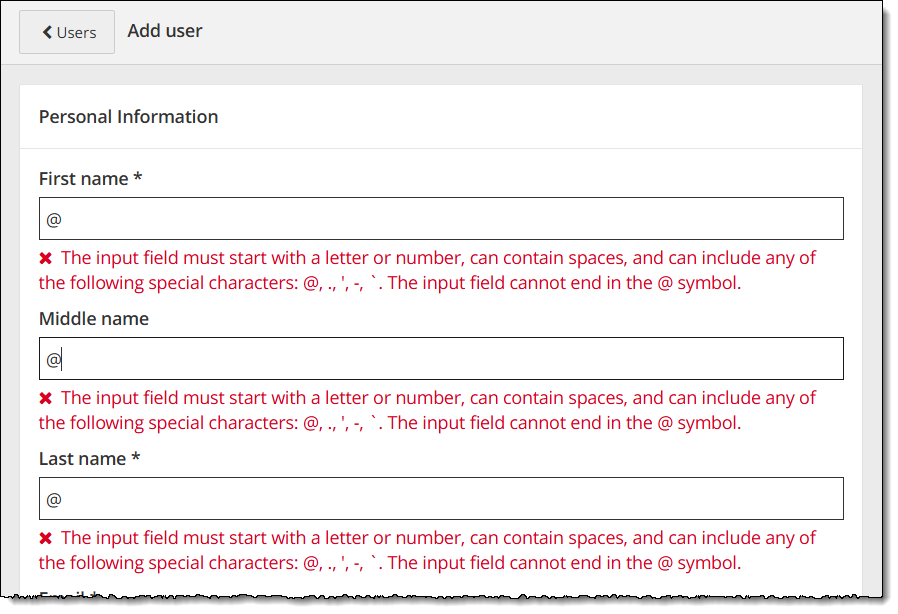
 - Enter a First name, optional Middle name, and Last name for the user.
|
The First, Middle, and Last name fields must adhere to the following characteristics:
If the first name, middle name, or last name violates any of these rules, an error message is displayed as soon as you navigate away from the name field.
|
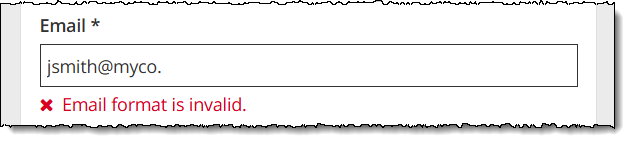
- Enter the user's Email address.
The email address must be a valid email format. When you start typing in the Email field the error message appears. Once you have typed in a valid email format the message disappears. The system does not verify that you have typed in a valid email address, it just verifies that the format is valid. ![]()
![]()
|
The Email address must adhere to the following characteristics:
|
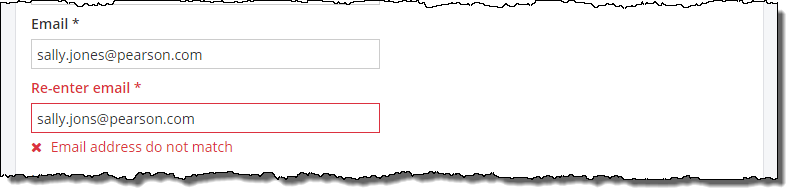
- Re-enter the email address for the new user.
|
You cannot copy and paste into the re-enter email address field. If your email addresses do not match, a message states they do not match.
If you change the Email field, the Re-enter email field is cleared out and you must re-enter the email address. |
- Enter a unique Username for the user.
The system does not check if it is a unique username until you save the user profile.
|
The Username must adhere to the following characteristics:
As a best practice, you should come up with a naming practice that will ensure your usernames will not be a naming structure other clients may use. For instance, you could use email address as the Username since everyone will have a unique email address. Another possibility is first 4 letters of the user's last name + first 2 letters of the user's first name + company name (e.g., Dan Johnson at My Company would be johndamyco). |


- Enter a Phone number for the new user.
|
The phone number must be a valid phone number format.
If you enter any of the special characters, an invalid phone number error appears.
|

Enter user account address
Address fields are optional for user accounts; but if you choose to add any address fields to the user account, you must add all the mandatory address fields.
- Select Add address
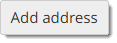 .
.
|
When you create a new user account, you are not required to provide the address information. If you choose to provide an address for the user, you must supply all the mandatory address fields before saving the new user account. |
- Enter the following required address fields:
- Select Country from drop-down list.
- Enter user Address 1.
- Enter City.

|
The mandatory fields change depending upon the Country selected when entering address information to a user account. If you do not know all the required address fields when you first create the user account, you are unable to save the new user account to the system. You can select Remove address and add the address information later. When you select Remove address, all the address fields are cleared, and you are returned to the basic Add user page. |
- Enter any remaining optional address fields.
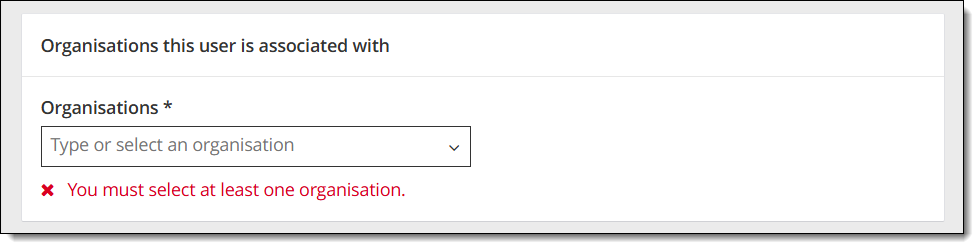
Associate a user account with an organization
|
|
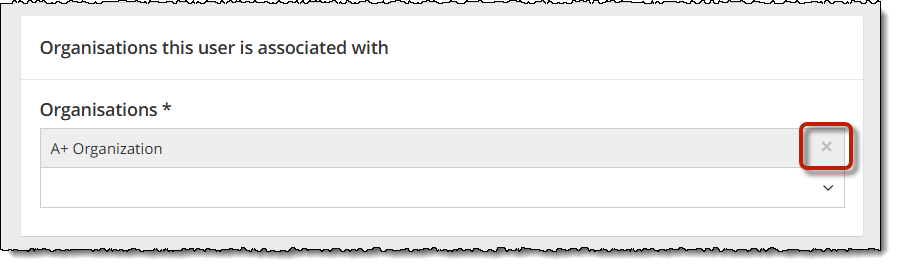
- Type the organization name or select an organization from the Organizations list.
If you start typing, the list dynamically filters to locate those organizations that include those characters. If a drop-down list does not appear, you do not have an organization that matches what you typed. You must select an organization that has been added to the system.
The Organization is added to the list. You are specifying this user may perform tasks for the client via the selected organization.
- To add the user account to additional organizations, place your cursor below the organization you just added. Select an organization from the Organizations list.
- To remove an organization from the user account, select the X button for the Organization.
Select the user account roles
You must select what type of user you wish to add. You may add a Scheduler user role (most users will be Scheduler users) or you may add an Organizations user role. The roles section includes an application drop-down list. ![]()
![]()
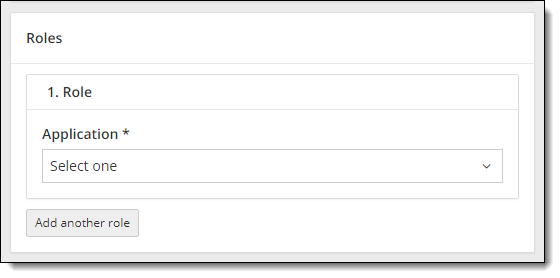
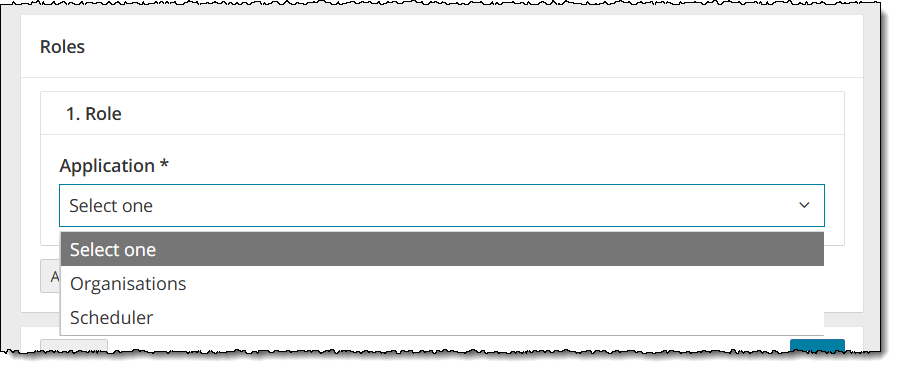
- Select the Application drop-down list and select the desired application.
- Select the appropriate role option buttons for the actions the user must perform.
Organizations Application ![]()
![]()
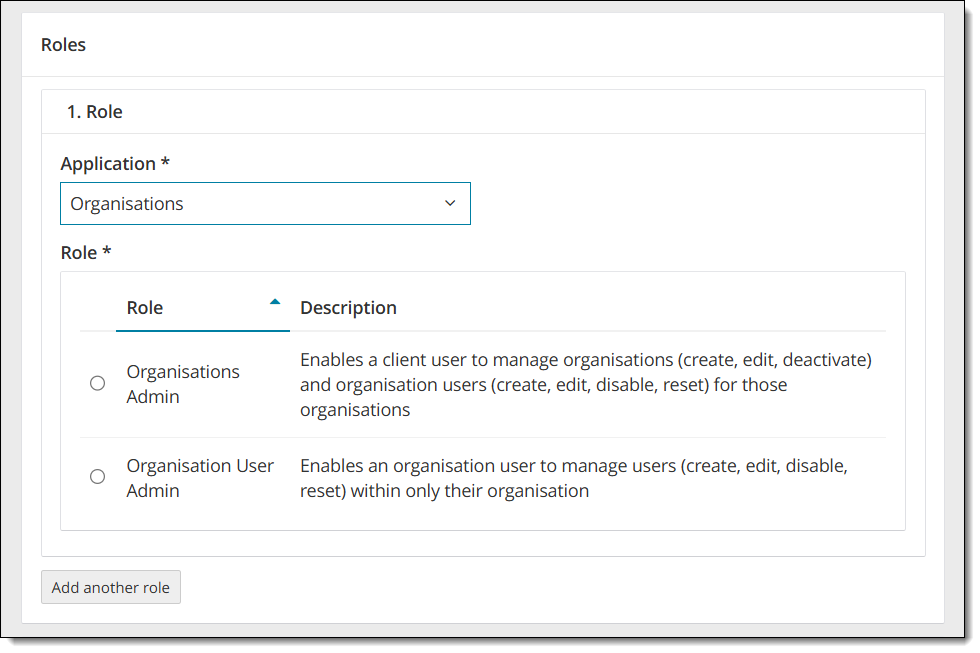
The Organizations application allows users to create and maintain accounts for third-party entities that perform transactions in the Pearson VUE systems on behalf of the client.
|
PERMISSION |
DESCRIPTION |
|---|---|
|
Organizations Admin |
Enables a client user to manage organizations (create, edit, deactivate) and organization users (create, edit, disable, reset) for their organizations. |
|
Organization User Admin |
Enables an organization user to manage users (create, edit, disable, reset) within only their organization. |
Scheduler Application ![]()
![]()
Scheduler Registration roles
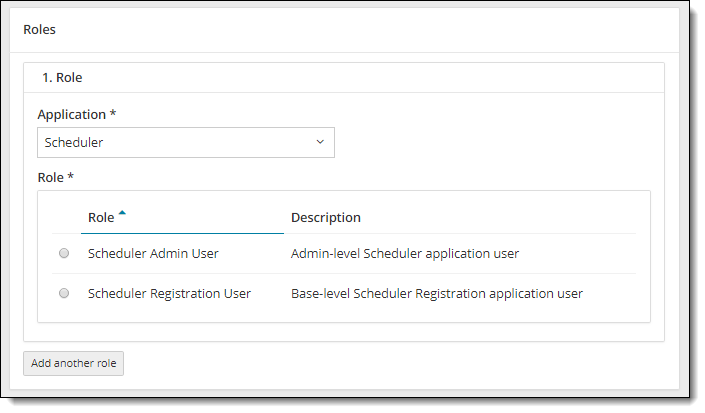
Scheduler Reservation roles

The Scheduler application may be used for two different purposes depending on how your company has implemented Scheduler:
Scheduler Registrations: Used to manage candidates, schedule, reschedule, or cancel candidate registrations, and apply payments for the exams. The candidate is known at the time of the booking.
Scheduler Reservations: Used to reserve blocks of exam appointments when the candidate is not known at the time of booking.
|
PERMISSION |
DESCRIPTION |
|---|---|
|
Scheduler Admin User |
Admin-level Scheduler application user Created for future use. Do not use. |
|
Scheduler Registration User |
Created for future use. Do not use. Users that must create rosters, search for candidates, create candidates and schedule, reschedule, or cancel exams on behalf of candidates must be assigned the Scheduler Registration User permission. |
|
Scheduler Reservation Admin |
Assist Scheduler Application Administrative User Pearson VUE Users that must book reservations on behalf of an organization must be assigned the Scheduler Reservation Admin permission. |
|
Scheduler Reservation User |
Base-level Scheduler Reservation User Users that must reserve blocks of exam appointments when the candidate is not known at the time of booking, assign and unassign candidates, or cancel reservations for an organization must be assigned the Scheduler Reservation User permission. |
- If the user requires more than one role, select the Add another role button. A second Role section is displayed. Select the desired role option button for the second role.

Save the user account
Once you have added the Personal Information, added Organizations, and assigned Roles, you can save the user account.
- Select the Save button.
A confirmation message appears at the top of the page confirming the user has been added. ![]()
![]() The system automatically generates an email to the new user with a link to set up their password and security questions. The link to activate the user account is only active for 7 days. Users must log on to Navigator within 7 days or the link expires.
The system automatically generates an email to the new user with a link to set up their password and security questions. The link to activate the user account is only active for 7 days. Users must log on to Navigator within 7 days or the link expires.

|
|

|
Once you save the user account, there is no way to delete the user account. Make sure you want to add the user before selecting the Save button. You may disable a user account if it is no longer needed. |
Pearson VUE Proprietary and Confidential