Edit Private Access Codes
Once a Private Access Code (PAC) has been created, you can edit it to add or remove exams. If the PAC has not been applied to an actual exam registration, you can also change the name of the PAC and change the delivery mode of the PAC. If a PAC is no longer needed, you can expire the PAC. If you want to reuse an expired PAC, you can edit the End date to reactivate the PAC.
Edit PAC
- Search for the desired PAC. See Search Private Access Codes.
- Select the Edit link on the right for the PAC you want to edit.
Add or remove exams on a PAC
Assign all exams to PAC
There are two methods for selecting all available exams:
- Make sure the Specific exams option
 is selected and use the Move all link in the Available exams column on the left.
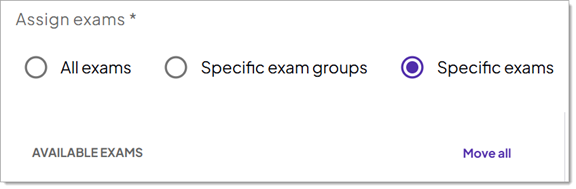
All exams in the Available column are moved to the Selected column on the right.
- Select the All exams option.
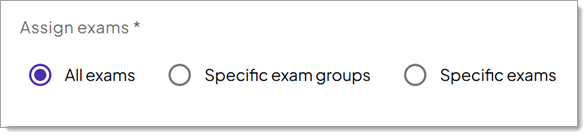
All exams of the selected delivery mode are assigned to the PAC. The list of applied exams is not displayed in the user interface, but all the available exams are applied to the PAC.
Assign individual exams to PAC
- Select the Specific exams option.
The list of available exams for the selected delivery modes are displayed in the Available column. Assign specific exams to a private access code.
|
If you do not see an exam in the Available exams list that you expected to see, contact your test publisher to ensure the correct Delivery mode has been applied to the exam, and that the PAC Required field has been selected for the exam/delivery mode combination. |
- Scroll through the list of Available Exams in the left column and find the desired exam name.
Drag and drop the desired exam into the Selected Exams column on the right.
- Rather than selecting individual exams from the filtered list, you can also use the Move all link.
|
The Move all link behaves differently than the All Exams option. The All exams option applies all exams for the selected delivery mode to the PAC. Use the Move all link after filtering the list of exams. For example, filter the list to display all exams for electrical engineering. Then select the Move all link. This takes all the exams that have been filtered and displayed in the Available Exams column and applies them to the PAC in the Selected Exams column. |
- Continue selecting exams you want to assign to the PAC.
Remove individual exams from PAC
- Make sure the Specific exams option is selected. Scroll through the list of Selected Exams in the right column and select the desired exam name you want to remove from the PAC.
Drag and drop the exam group back to the Available Exams column.
If you remove all exams from the Selected Exams, a message reminds you that no exams are selected for the PAC. The PAC must be associated with at least one exam.
Remove all exams from PAC
- You must have the Specific exams option selected. Select the Remove all link in the Selected Exam column on the right.
All the exams are moved back to the Available Exams column. A message states that at least one exam must be associated with the PAC.
Add or remove exam groups on a PAC
Assign individual exam groups to PAC
- Select the Specific exam groups option.
All client exam groups are displayed in the Available column. Assign specific exam groups to a PAC.
|
If you do not see an exam group in the Available exams list that you expected to see, contact your program manager to ensure the exam group has been configured. |
- You can search for a specific exam group by typing in any part of the exam group name.
|
The list of exams is dynamically filtered as you type in the search field. You can type in any part of the exam group name, and all exam groups matching the text entered are displayed. |
- Scroll through the list of Available Exams groups in the left column and find the desired exam group name.
Drag and drop the exam group to the Selected Examscolumn.
- Rather than selecting individual exam groups from the filtered list, you can use the Move all link.
|
The Move all link behaves differently than the All exams option. The All exams option applies all the client's exams to the Authorization. Use the Move all link after filtering the list of exam groups. For example, filter the list to display all exam groups for electrical engineering. Then select the Move all link. This takes all the exam groups that have been filtered and displayed in the Available Exams column and applies them to the PAC in the Selected Exams column. |
- Continue selecting exam groups you want to assign to the PAC.
Remove individual exam groups from PAC
- Scroll through the list of Selected Exams groups in the right column and find the desired exam group you want to remove from the Authorization. Drag and drop the exam group back into the Available Exams column
If you remove all exam groups from the Selected Exams, a message reminds you that no exams are selected for the PAC. The PAC must be associated with at least one exam.
Change PAC delivery mode
If a Private Access Code has not been applied against an actual exam registration, you can change the delivery mode for the PAC.
- Select the Edit link of the desired PAC.
|
If the PAC has been applied to an exam registration, the Delivery mode drop-down list is disabled, and you are unable to change the delivery mode.
|

- Select a different Delivery mode from the drop-down list.
|
When you change the Delivery mode, all previously selected exams are removed from the Selected Exams column and a message now states that at least one exam must be associated with the PAC. Only those exams that are available for the selected Delivery mode are displayed in the Available Exams column. |
The PAC delivery mode is used for the following exam delivery types:
|
PAC DELIVERY MODE |
|
EXAM DELIVERY TYPE |
|---|---|---|
|
Anywhere Proctored IBT Exam |
= |
Client proctored - no appointment required |
|
IBT at VUE Test Center |
= |
Test Center IBT delivery |
|
IBT at Zero Footprint Test Center |
= |
Client proctored - appointment required |
|
Paper Delivery at Zero Footprint Test Center |
= |
Paper Delivery |
|
Unproctored Delivery |
= |
OnVUE Online Proctored Delivery |
|
VUE Standard Delivery |
= |
Delivery on Athena — Desktop Edition test driver |
- You must reassign exams to the PAC.
- Select Save.
Change PAC code name
If a PAC has not been applied to an actual exam registration, you can change the Private Access Code name.
- Select the Edit link of the desired PAC.
|
If the PAC has been applied to an exam registration, the Private Access Code field is disabled, and you are unable to change the code.
|
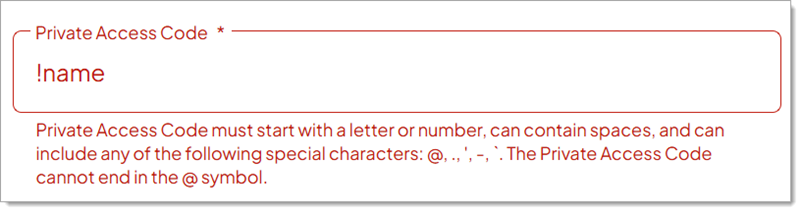
- Change the name of the PAC in the Private Access Code field.
|
Private Access Codes must adhere to the following characteristics:
If the private access code name violates any of these rules, an error message is displayed as soon as you navigate away from the Private Access Code field.
|
|
If an existing PAC name or description includes any of the forbidden naming rules, an error is displayed at the top of the Edit private access code page and an error message for the PAC name field is displayed when you Save the PAC. You must fix the PAC name and then Save the PAC. If a PAC has been applied to an exam registration, the PAC name field is locked down and you are unable to change the name. If the PAC name includes any of the forbidden naming rules, you cannot Save any edits to the PAC. |
- Select Save.
Expire a PAC
If a PAC is no longer needed or if you want to disable a PAC, you can change the End date calendar date to a date in the past.
|
There is no way to delete a PAC once it has been created. You can expire it so it is no longer visible in the Active list of PACs. |
- Select the Edit link of the desired PAC.
-
Select the End date calendar field.
- Select a date prior to the current date.
- Select the End time field and select and end time.
- Select Save.
The PAC is removed from the list of active PACs. See Advanced Search in the Search by Status: All/Active/Inactive topic for instructions on viewing inactive PACs.
Reactivate a PAC
Once a PAC has been expired, you may want to reactivate it. First you must locate the PAC in the list of expired PACs. You can change the End date to a future date, and this moves the PAC to the active list.
- Follow the instructions in the Advanced Search in the Search by Status: All/Active/Inactive topic to display all the expired PACs.
- Search for the desired PAC.
- Select the Edit link of the desired PAC.
- Select the Start date field and set a start date.
- Select the Start time field and set a start time.
- Select the End date field and select a date after the current date.
- Select the End time field and set an end time.
- Select Save.
The PAC is removed from the list of expired PACs and moved back onto the list of active PACs.
Save PAC changes
- Select Save.
A message is displayed above the PAC list stating the PAC changes were saved.
Pearson VUE Proprietary and Confidential