Create New SSO User Account
A user account must be created so they can login to the Navigator portal. These instructions assume you are logged in as a Single Sign On (SSO) user.
|
The process for creating a new standard Navigator user is slightly different. See the Create new standard Navigator user account topic for details on creating new standard Navigator users. |
|
Only User Management Client administrators, VUE Administrators, and VUE Super Users can create new user accounts. If a client user will be assigned the proctor role in addition to other roles within Navigator, you may either create the proctor account within Proctor Management first and then go into User Management to assign the other permissions, or you may create the user in User Management and then go into Proctor Management and make the user a proctor. Assigning the proctor role must be done in Proctor Management. If you need to create an Organizations application user account, you must create that user account within Organizations User Management. See the Organizations Help and view the Add Users topic. |
Enter new user Personal account information
- Select the Create user
 button in the upper right-hand corner of the Search users page.
The Create a new user screen opens. ![]()
![]()
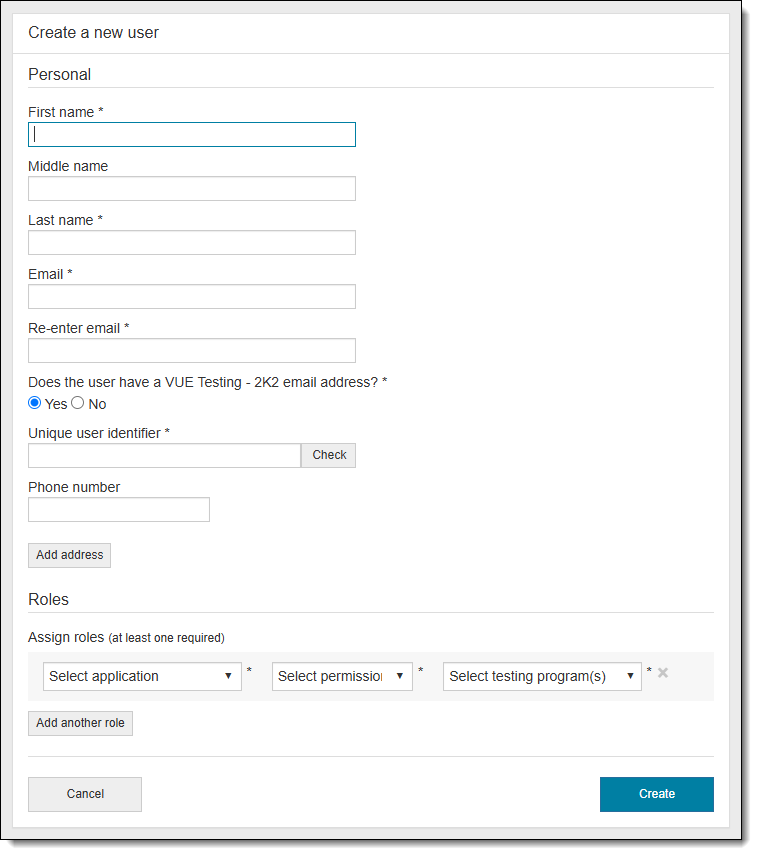
- Enter the First name, and Last name for the new user account.
Middle name is optional.
|
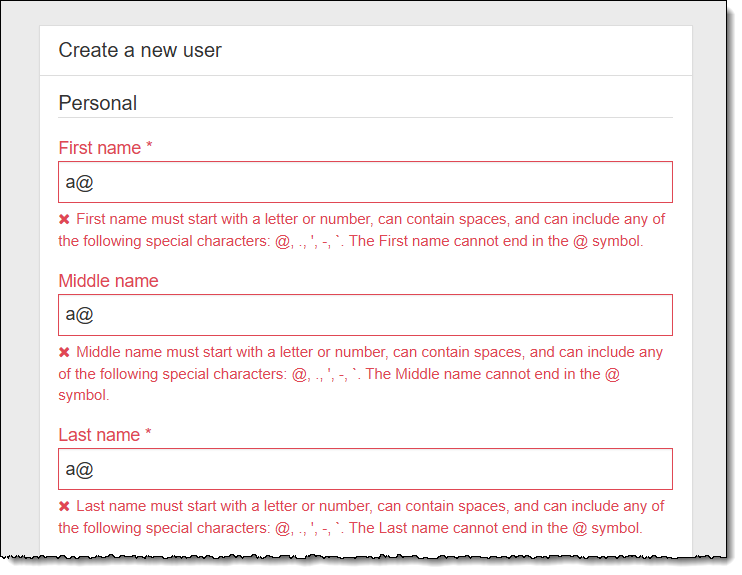
The First, middle, and Last name fields must adhere to the following characteristics:
If the first name, middle name, or last name violates any of these rules, an error message is displayed as soon as you navigate away from the name field.
|
- Enter an Email for the new user account.
|
The Email address must adhere to the following characteristics:
|
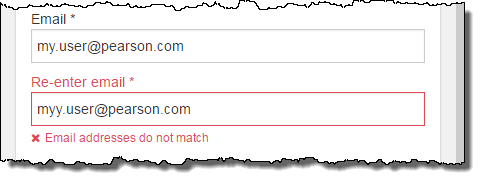
- Re-enter the email address for the new user.
|
You cannot copy and paste into the re-enter email address field. If your email addresses do not match, a message states they do not match. This message appears after you navigate away from the re-enter email field.
If you change the Email field, the Re-enter email field is cleared out and you must re-enter the email address. |
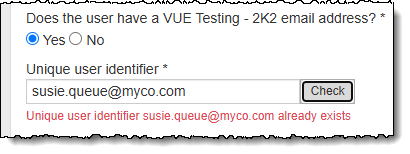
- Select the Yes option for the Does the user have a <client name> email address? if a new SSO user is being created.


- Select the No option if a new standard Navigator user is being created.
|
This is for users that are not employees of the client that will be logging in to the Navigator portal on behalf of the client. See the Enter new user Personal account information section in the Create New User topic for details on creating a standard Navigator user. |
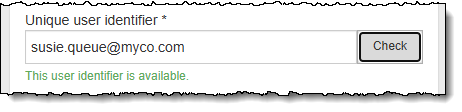
- Enter a Unique user identifier and select Check.
|
The Unique user identifier must adhere to the following characteristics:
If the Unique user identifier is available, a message states the user identifier is available.
If the Unique user identifier is already taken within the list of all Navigator users, a message states the Unique user identifier already exists.
Each SSO client determines what unique identifier will be used for all the client's SSO Navigator users in their organization. All SSO users for the client must use the same type of unique identifier. For example, clients may use the employee email address, or an employee ID#. Every user must have a unique identifier so they can login to Navigator. These users log in from the client side to SSO into Navigator. |
- Enter a Phone number for the new user.
|
The Phone number can be a max of 20 characters. You may enter the phone number using dashes, periods or spaces. The Phone number is an optional field. |
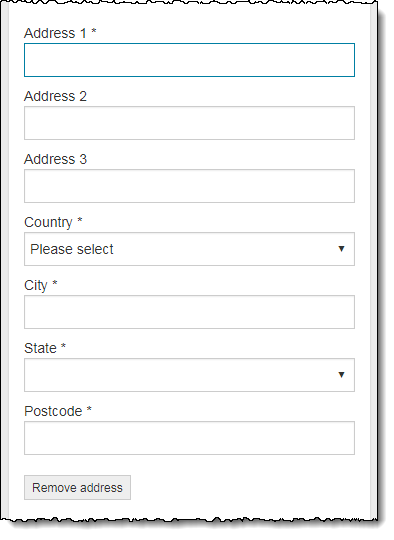
Enter user address
Address fields are optional for user accounts; but if you choose to add any address fields to the user account, you must add all the required address fields.
- Select Add address.
|
When you create a new user, you are not required to provide the address information. If you choose to provide an address for the user, you must supply all the mandatory address fields before saving the new user. |
- Enter the following required address fields: Address 1, Country, City, State, and Postcode.
|
The mandatory fields change depending upon the Country selected when entering address information to a user account. If you do not know all of the required address fields when you first create the user, you are unable to save the new user account to the system. You can select Remove address and add the address information later. When you select Remove address, all the address fields are cleared, and you are returned to the basic Create new user page. |
Assign roles to the user account
At least one role must be assigned to a user account.
|
|
Select application
- Select the Select application drop-down arrow and select the desired application in the list.
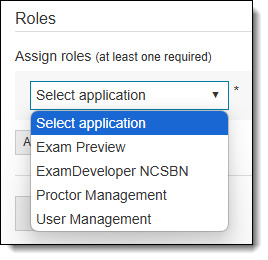
The list of available applications to choose from will vary depending upon which applications a client has chosen to use. You may only assign new users to the application roles your client profile has elected to use.
|
APPLICATION |
ROLE DESCRIPTION |
|
All Navigator Applications |
We recommend you not use this option when assigning roles to users. You should individually assign a user each role they need to complete their job responsibilities. In this way, you control which applications each user has access to in the Navigator portal. Otherwise, when a new application is added to the Navigator portal for your client profile, any users set to All Navigator Application role are automatically assigned permission to use the new application. For security reasons, this could be dangerous because you may not want all users to access all the applications. For instance, you probably do not want to give all users the ability to create and modify user profiles within the User Management application. |
|
Client Proctored Documentation-ITS |
Users who access the ITS secure browser Client proctored support documents must be assigned the Client Proctored Documentation ITS role. Client Proctored Documentation-ITS application is used to find documents that support the ITS Client proctored delivery model. Users, such as proctors and proctor administrators, require access to these documents to support their testing program. |
|
Client Proctored Documentation-PVBL |
Users who access the Pearson VUE Browser Lock (PVBL) secure browser Client proctored support documents must be assigned the Client Proctored Documentation PVBL role. Client Proctored Documentation-PVBL application is used to find documents that support the PVBL Client proctored delivery model. Users, such as proctors and proctor administrators, require access to these documents to support their testing program. |
|
Connection Check |
Users who verify they can connect to the Internet and successfully deliver exams using the Athena - Browser Edition test driver during Anywhere Proctored exam delivery must be assigned the Connection Check role. Connection Check performs two tasks. A speed test determines the upload and download speeds of your current internet connection. The connection test verifies connectivity to the servers that are used to deliver an exam. |
|
Discounts |
Users who create and maintain discounts for the client must be assigned the Discounts Navigator role. Discounts allows user to manage coupons, vouchers, and automated discounts to candidates to reduce the cost of exam registrations. |
|
Exam Preview |
Users who test the functionality and scoring of Athena - Browser Edition exams must be assigned the Exam Preview role. Exam Preview is a comprehensive, all-in-one application that allows exam quality assurance and verification tasks to be performed in one place. Specifically, Preview allows users to view the exam in a web browser, Inspect contains the exam repository inspection details, and Simulate allows users to run scoring simulations. |
|
ExamDeveloper |
ExamDeveloper™, Pearson VUE’s industry-leading test development technology, is a suite of test-development tools built on principles of psychometric integrity and best practices. Users who develop exam items using the latest version of item writer, may be assigned the Client Access to ExamDeveloper role. |
|
IntelliVUE |
Users who view IntelliVUE reports must be assigned the IntelliVUE role. IntelliVUE allows users to report on their testing program, including candidate and result data. It provides reports where users can specify filtering criteria to return a data set that meets their needs. |
|
Location Codes |
Users who create and maintain Location Codes for the client must be assigned the Location Codes role. Location Codes are used to define a physical location for an Anywhere Proctored Exam. |
|
Media Content Deployer |
Users who deploy media such as audio or video must have the Media Content Deployer role. Uploaded media can then be used in Exam Preview or in various test delivery modes. |
|
OnVUE Video Review |
Users who search for specific recorded video sessions and download them to review the session must be assigned the OnVUE Video Review - Reviewer role. |
|
Organizations |
Users who create and maintain accounts for third-party entities that perform transactions in the Pearson VUE systems on behalf of the client must be assigned the Organizations role. The Organizations application consists of two main components: Organization Management and User Management. |
|
Prerequisites |
Users who manage exam prerequisites must be assigned the Prerequisite role. |
|
Private Access Codes |
Users who create and maintain Private Access Codes for the client must be assigned the Private Access Codes role. Private Access Codes are used to make an exam private. Candidates must enter the private access code to register for an exam. They are most commonly used for Client proctored - no appointment required exams. |
|
Proctor Management |
Users who maintain proctor accounts for a client must be assigned the Proctor Management role. If a user will proctor Client proctored - no appointment required exams, you must create the proctor within the Proctor Management application. You may make an existing user a proctor. |
|
Proctoring |
Proctor users who unlock Anywhere Proctored candidate exams are automatically assigned the Proctoring user role. Client administrator users who wish to view proctoring events that were created by their own proctors must be assigned the Proctoring client access role. The Proctoring application allows proctors to create proctoring events that are used to unlock Anywhere Proctored candidate exams from a single, centralized location, rather than moving from workstation to workstation. Client administrators may view proctoring events their own proctors have created. |
|
Reasonable Adjustments Hub |
Users who access the Reasonable Adjustments Hub can create, edit, and view reasonable adjustments requests for candidates depending on thier assigned user role. The Reasonable Adjustments Hub is Pearson's centralized system for managing exam accommodations for candidates. It allows both Pearson staff and client organizations to create, track, and manage accommodation reqests, ensuring candidates receive the testing adjustments they need. |
|
Scheduler |
Users who manage candidates, schedule, reschedule, cancel candidate registrations, and apply candidate payments for exams must be assigned the Scheduler role. Candidates are known at the time of the booking. |
|
Scoring Check |
Users who validate that a SIF (Scoring Information File) is constructed correctly must be assigned the Role for using Scoring Check application. |
|
User Management |
Users who create and maintain other users must be assigned the User Management role. |
Select permission
- Select the Select permission drop-down arrow and select the desired permission for the application role.
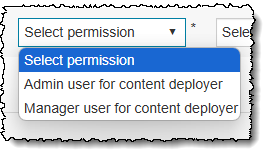
The permissions available to you will be based on your permissions within Navigator. VUE administrators have access to more permissions than an individual client administrator.
|
APPLICATION |
ROLE PERMISSION |
|
All Navigator Applications |
If you are a client User Manager Admin, you may give a new user client level access to all the applicable client applications. If you are a VUE Admin, you may give a new user either client level access to all the applicable applications, or you may give a new user VUE Admin access to all Navigator applications for one client, or many clients. We recommend you not use these permissions for most users. You should individually assign a user each role and permission they need to complete their job responsibilities. This gives you control over the specific activities each user may perform within the assigned application. |
|
Client Proctored Documentation-ITS |
There is only one Client Proctored Documentation-ITS permission, User Access. Users who access the ITS Client proctored support documents must be assigned the Access to Client Proctored Documentation permission. |
|
Client Proctored Documentation-PVBL |
There is only one Client Proctored Documentation-PVBL permission, User Access. Users who access the Pearson VUE Browser Lock (PVBL) test driver Client proctored exam delivery mode support documents must be assigned the Access to Client Proctored Documentation permission. |
|
Connection Check |
There is only one Connection Check permission, Connection Check User. Proctors who run a connection check test for Client proctored - no appointment required exam delivery using the Athena - Browser Edition test driver must be assigned the Connection Check User permission. |
|
Discounts |
Select from the following Discounts permissions: Role for activating discounts - Users that must activate coupons, vouchers, and automated discounts must be assigned the Role for activating discounts. These users can create, edit, and activate discounts, but they cannot approve discounts. Role for viewing and editing discounts - Users that must create coupons, vouchers, and automated discounts should be assigned the Role for viewing and editing discounts permission. These users can both create discounts and edit them. They cannot approve or activate discounts. Role for approving discounts - Users that must approve coupons, vouchers, and automated discounts must be assigned the Role for approving discounts permission. These users can create, edit, and approve discounts, but they cannot activate discounts. Role for reviewing discounts - Users who only need to view the coupons, vouchers, and automated discounts should be assigned the Role for reviewing discounts permission. These users cannot create or edit discounts. Note: Users can be assigned multiple Discounts permissions. |
|
Exam Preview |
There is only one Exam Preview permission, User for Exam Preview. Users who perform Inspect, Preview and Simulate activities for exams must be assigned the User for Exam Preview permission. |
|
ExamDeveloper |
There is only one ExamDeveloper permission, Client Access to ExamDeveloper. Additional roles and permissions can be set in legacy ExamDeveloper. |
|
IntelliVUE |
Select from the following IntelliVUE permissions: Run ILD Reports - Users who generate response level item data should be assigned the Run ILD Reports permission. Data includes candidate responses and exit survey information. Run ILD Statics Reports - Users who generate statistical data based upon candidate responses should be assigned the Run ILD Statistics Reports permission. Data includes test, item and item option statistics, and candidate comments. Run Intellivue Reports - Users who generate data for standard reports should be assigned the Run IntelliVUE Reports permission. Data includes accommodations, authorizations, test centers, candidate search, discounts, exam activity and performance, and volume by testing center. (This is the default permission for most users.) Run Intellivue Wizards - Users who generate data in an ad hoc manner should be assigned the Run IntelliVUE Wizards permission. Users will be allowed to choose all data elements included in the final data set. Run Quick Look Reports - Users who report on data in near real-time must be assigned the Run Quick Look Reports permission. |
|
Location Codes |
There is only one Location Code permission, User Access. Users who create and maintain Location Codes for the client must be assigned User Access permission. |
|
Media Content Deployer |
There are two roles that may be assigned for Media Content Deployer. Admin user for content deployer – Users who require full control of the media content, including the ability to delete content should be assigned the Admin user for content deployer role. Manager user for content deployer – Users who use the Media Content Deployer but are not allowed to delete content should be assigned the Manager user for content deployer. |
|
OnVUE Video Review |
There is only one OnVUE Video Review role that may be assigned for OnVUE Video Review, View completed sessions and download assets. Users who search for specific recorded video sessions and download them to review the session must be assigned the View completed sessions and download assets role. |
|
Organizations |
There are two Organizations permissions: Enables a client user to manage organizations (create, edit, deactivate) and organization users (create, edit, disable, reset) for their organizations Enables an organization user to manage users (create, edit, disable, reset) within only their organization |
|
Prerequisites |
There are two permissions available for Prerequisites: Create and manage Prerequisites - Allows users to add, update, and delete prerequisite rules. View only access to Prerequisites - Allows users to view prerequisite rules. Users assigned this permission are not able to add, edit, or delete prerequisite rules. |
|
Private Access Codes |
There is only one Private Access Code (PAC) permission, User Access. Users who create and maintain Private Access Codes for the client must be assigned User Access permission. |
|
Proctor Management |
There is only one Proctor Management permission that may be assigned from within User Management, Client access to proctor management application. Users who maintain proctor accounts for a client must be assigned the Client access permission. Users with the Client access to proctor management application permission are not able to proctor exams and are not listed as a proctor within Proctor Management unless the user was assigned the Proctor access to account and proctor profile within proctor management permission. To make an existing user a proctor, you must create a proctor within the Proctor Management application and enter the exiting User Name. This makes the user a proctor. |
|
Proctoring |
When you create a Proctor or assign an existing user as a proctor within Proctor Management, the Proctor access to account and proctor profile within proctoring application permission is automatically assigned to the Proctor user. This permission allows proctors to create proctoring events that are used to unlock Client proctored - no appointment required candidate exams from a single, centralized location, rather than moving from workstation to workstation. There is only one Proctoring permission that may be assigned from within Navigator User Management, Client access to application. Users who view proctoring events that were created by their own proctors must be assigned the Client access permission. |
|
Reasonable Adjustments Hub |
The Role for viewing all Reasonable Adjustments allows users to view all accommodation requests across the organization. The Role for viewing and editing Reasonable adjustments allows users to submit modify accommodation request details, update status, and add comments. |
|
Scheduler |
Only the Base-level Scheduler application user permission should be assigned to Scheduler users. Users who create rosters, search for candidates, create candidates, and schedule or cancel exams on behalf of candidates must be assigned the Base-level Scheduler application user permission. The Admin-level Scheduler application user permission was created for future use. Do not use this permission. |
|
Scoring Check |
There is only one Scoring Check permission that may be assigned to a Scoring Check role, Role for using Scoring Check application. Users who validate that a SIF (Scoring Information File) is constructed correctly must be assigned this role. |
|
User Management |
There is only one User Management permission that may be assigned to a User Management role, Client access to the user management application. Users who maintain user accounts must be assigned Client access permission. |
Select testing program(s)
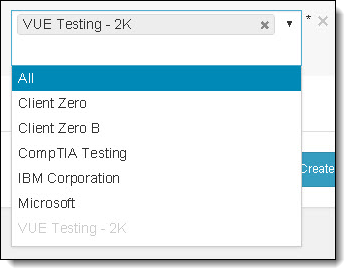
- Select the Select testing program drop-down arrow and select the desired client testing program you wish to apply against the role.

If you only have permission to add roles for an individual testing program, only that client name appears in the testing program list.
- If you have permission to assign roles to multiple testing programs, click in the white space below the client you just added. The testing program list opens. Select the desired client from the list.
Add more application roles
- Select the Add another role button.
- Repeat the steps selecting the Application, Permission, and Testing Program.
Save the new user account
Once you have added the personal account information, address, and assigned at least one role to the user, you may save the new user account.
- Select the Create button in the lower right-hand corner of the Create a new user page.
A message is displayed stating the new user account was successfully created.
Pearson VUE Proprietary and Confidential